


Handpan making is more than just “beating out a bowl.” It’s a lengthy, meticulous process with a high failure rate, often requiring a maker to devote dozens or even hundreds of hours. The process can be divided into the following core stages:
Stage 1: Design & Material Selection
Key Design: Before beginning, the maker must first determine the key of the handpan (e.g., D Kurd, C Arabian, etc.). This determines the fundamental pitch of the center ding note and the arrangement and relationship of the surrounding notes (Tone Fields).
Steel Selection: Mainstream handpans are typically made from two types of steel:
Nitrided Steel: This is the most commonly used and highly regarded material. It’s extremely hard and corrosion-resistant, producing a bright, long-lasting sound rich in overtones. Representative brands include PANArt (creator of the Hang).
Stainless Steel: Easier to work with, it typically produces a warmer, softer tone with a slightly faster decay. Many leading brands also use stainless steel.
Cutting: The selected large steel plate is plasma-cut or laser-cut into a circular blank.
Stage 2: Shaping
Hydraulic Pressing: The flat circular billet is placed on a mold and pressed into the iconic “flying saucer” shape using a massive hydraulic press, forming the initial outlines of the upper (Ding) and lower (Gu) shells.
Hand Hammering: This is the most traditional and artistic method (also used by PANArt). The craftsman relies entirely on experience and feel, hammering the billet into the final dome shape bit by bit. This method gives each handpan its unique character.
Stage 3: Tone Field Layout & Initial Tuning
Marking the Tone Fields: On the dome of the upper shell, the positions and shapes of the central Ding and the surrounding 7-8 tone fields are precisely marked according to the designed tuning.
Hammering: Using hammers of various shapes and a top iron, the marked area is indented by hammering, forming the initial pitch range. The depth, shape, and curvature of each indentation influence the final pitch and timbre.
Stage 4: Fine Tuning – The Core and Most Difficult Step
This is the most demanding part of the production process, requiring the maker’s skill and ear, taking the longest time and having the highest failure rate. Tuning is not done by tightening screws; rather, hammering is performed to alter the metal’s internal stresses, thereby changing its pitch.
Normalizing: After initial forming, the steel shell undergoes significant internal stress due to hammering, making it hard and brittle. The maker heats it to a specific temperature (approximately 800-900°C) and then slowly cools it to relieve the stresses and soften the steel, preparing it for the subsequent fine tuning.
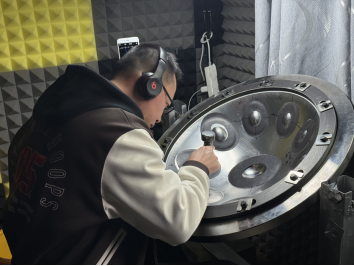
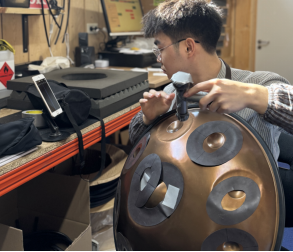
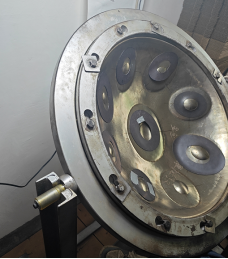
Hammer Tuning:
The maker secures the shell to a dedicated stand, captures the sound of each note with a monitoring microphone, and analyzes its fundamental frequency and overtone series using spectrum analysis software.
They use specially crafted small hammers to strike extremely lightly at specific locations in the register.
Strikes at the center of the register (the crown) typically lower the pitch.
Strikes at the edge of the register (the shoulder) typically raise the pitch.
This process requires thousands of repetitive fine-tuning cycles. The goal is not only to ensure the fundamental tone of each register is accurate, but also to ensure its overtones are pure, rich, and resonate harmoniously across registers. A good maker tunes not just individual notes, but the entire instrument’s soundstage and resonance.
Stage 5: Assembly & Final Treatment
Gluing: The upper and lower shells are bonded together, typically using high-strength epoxy glue. The seal and strength of the bond are crucial, affecting resonance and durability.
Nitriding (if using nitrided steel): The assembled pan is placed in a special furnace and nitrogen gas is introduced at high temperatures. Nitrogen atoms penetrate the steel surface, forming an extremely hard and wear-resistant nitride layer. This process ultimately locks in the pitch, which will barely change with subsequent striking. This is why nitrided steel pans are so stable and durable.
Finishing: The surface is cleaned, polished, or aged to give it its final appearance.
Final Quality Control: The panmaker performs a final, thorough inspection of the instrument’s pitch, tone, appearance, and feel to ensure it meets factory standards.
Raysen handpan making process:
https://youtu.be/H7Fd4OWj-cY?si=rWPfis2RbCEMpZDq


